
Bring Your Chandelier Back To Life With A DIY Chandelier Makeover

I love my chandelier, but up until recently, not so much.You see, my living room is pretty warm and cozy, which I've liked, up until lately. I've wanted to brighten things up a bit and what better way to do that without spending much mullah then by updating what I already have?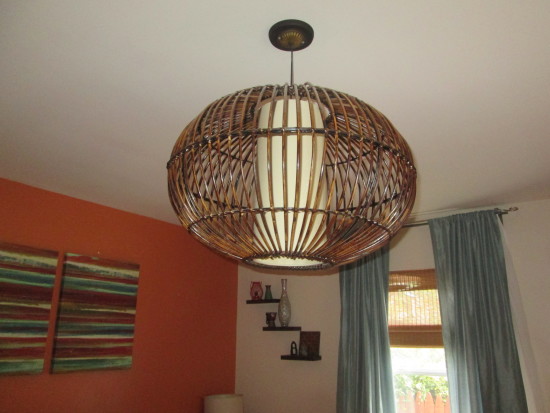 So, I had a light bulb moment and decided to spray paint my chandelier a pretty gold color and remove the shade part of it to allow more light to shine through.Now I must admit that I've had this project on my TO DO list for some time now and now I remember why I procrastinated with getting this project going. (Note to self...do not attempt anymore DIY projects while the kids are in the house)I thought this was going to be an easy process, but my chandelier didn't want to cooperate and neither did my little ones and so began my chandelier makeover adventure...I got all of my gear ready for this one:-ladder-screwdriver-toolbelt-painter's tape-gloves-wrench-newspaper or scrap paper-sand paper-black sharpie marker
Down Goes The Chandelier
Off went the power in the living room and down went the chandelier. (power went out after this pic)
Prep Time Began
I got the kids dressed and headed on to the backyard where the rest of this makeover would take place. After about 30 minutes of fighting with my chandelier, I won (bruised finger and all) by finally detaching the shade from the rest of the piece.Got to taping the parts of the chandelier that I didn't want to change and got my sanding thing out and got to sanding.
A Spray Away I Went
Placed some newspaper sheets on the floor, got my spray can out and got my spraying on. Oh and while I worked on this, check out what my little ones were up to. Drying time took some time since I had to give it a few coats and cover the top and bottom of the chandelier.So this is what I did to kill the time between drying sessions.
 Damn how I love chillaxin' with my little LeLe on the hammock.
All Glamed Up
Once my chandelier was dry from it's facelift, this is what it looked like.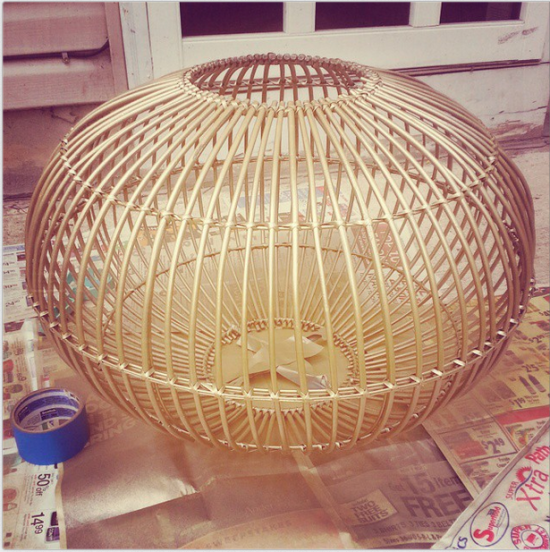 Love it!
Mounting Time
Once totally dry, it was time to mount this bitch back up. I say bitch because that's exactly what I kept calling it along with some other things. Mounting it back up took what felt like f-o-r-e-v-a-h maybe because I didn't have any extra grown up hands to help so this is what I did to hold it up while I connected the wires.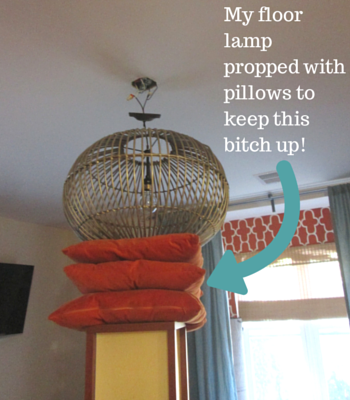 Before I screwed the medallion back in, I tripple checked that everything was working a okay, then turned the power back on to make sure that it worked so a screwing I went.Of course with my luck and a room filled with screaming kids, I screwed everything back into place walked my buns over the the electrical box, turned the power back on, then the light switch and to my surprise....the shit didn't light up!Let me tell you now, cover your kids eyes, ears, etc because all that was coming out of my mouth was f@*k, f*%ck, f&^ck! So I had to start all over (unscrew and screw back on while trying to keep my floor lamp from tiping over (which I couldn't stop by the way). Needless to say after about an hour, I got the shit to work.The clouds up in the heavens parted and a smile like no other came upon my face, while I did the happy dance.FINALLY!!!!! :-) :-) :-)
Final Touches
I noticed that some areas of the chandelier were discolored from the beating it took when took off the shade so I took out my black sharpie marker and got to coloring. 
The Big Reveal


Now I must admit that the second picture doesn't do my revamped chandelier any justice (by the time I was done, much of the natural light was gone, so this pic is rather dark). I promise to take some better pics in a few days and post them up. UPDATE: Pics updated (nature was cooperating today :-) )So what do you think of my DIY chandelier makeover? Are you feeling inspired enough to try this on your own or do you need a hand with revamping your space? Well you're in luck cause I can help with that here.Live Happy!